|
|
Post by killbucket on Dec 14, 2010 22:59:16 GMT -5
 Tying together most of my hobbies:  a nightvision, ghzzy-linked RC track vehicle,  With airsoft gun onboard. Precision mayhem from the comfort of bed.My back yard sentry: Also nightvision-eq'd. What if you hooked a variable-speed circuit from a drill, to an airsoft gun? My 4WD Ford GT:  with fully  transparent frame.  Another cordless drill grafted into an HPI Wheely King, Custom-CNC frame by me.  Scratchbuilt SteamPunk goggles.  these were fun to make, and they match  my walking stick: of course, made by me from an old M14 rifle barrel.  I could fend off a grizzly with it; hurt him bad, I tell you.  Google Killbucket Minigun...I've lost count of how many I've made.  Ditto Browning copies. Ditto Browning copies. |
|
|
|
Post by killbucket on Dec 16, 2010 5:38:56 GMT -5
Current project.
Past project.
Ditto.
|
|
frank
New Member

Posts: 5
|
Post by frank on Dec 16, 2010 5:47:59 GMT -5
Re M134 Minigun video, you've watched the movie The Jackal one too many times! Good stuff. Wait, you're married!? My wife thinks she has it bad, I should introduce her to you.  |
|
|
|
Post by killbucket on Dec 16, 2010 6:57:21 GMT -5
|
|
|
|
Post by killbucket on Dec 17, 2010 12:39:29 GMT -5
|
|
|
|
Post by killbucket on Dec 19, 2010 20:11:46 GMT -5
 Anybody can build a T-bucket...I may never build this car I designed nearly a decade ago. It's a basic Tee frame, with a gennie Rolls grille, and scratchbuilt 1909 Roadster body.  This 3D file is complete down to the rolling elements in the bearings. But I digress... Seems I do have enough RC parts to cobble something together for fun... Anybody can throw money, let's throw junk:I plan to purchase a new cordless drill to use for its motor and planetary transmission, but all the rest has to come from the goodie bins, just to keep it interesting. Right up front, don't expect any chrome...  Starting with an HPI Wheely King axle, a pair of  Tamiya Wild Willy2 steering arms and front axles, and the full set of wheels and tires from  this big (1/4? 1/5?) '41 Willy's DOG, I drew the rest in TurboCAD.  Setting next to an AA battery, you see they are very good-sized, if a bit on the skinny side. Nothing wrong with a bit of Old School...  The WK's axle carriers were trimmed down a bit to clean them up. Frame gussets are milled in place, not added on. I cut the frame from 6mm thick ABS sheet from www.interstateplastics.com.  The wishbones and traction bars are my own idea/geometry, but are meant to emulate street rod parts, cheap ones. I did plan in a proper four-bar: the mount holes are already in the frame rails.  It was a bit of a trick to adapt the wheels from the New Bright '41 Willys: it had tiny hex recesses in the rims, and a single screw held them on.  I drilled the centers out. In the front, I trimmed a set of Tamiya Wild Willy2 (what else?) front rims down to the bearing carriers, and bonded them into the back of the '41's wheels. I decided to leave part of the inner support vanes, because they reminded me of old Buick drum brakes, kinda. For the back wheels, I made small discs on my lathe using the same 6mm ABS plastic, duplicating the recess for the usual cross-pin drive, making the wheels direct-mount now, no hexes at all.  The outer "mag" chrome just snaps into place, hiding the wheel nuts completely. More to come... |
|
|
|
Post by killbucket on Dec 19, 2010 20:12:54 GMT -5
thanks!  CAD for modifying the Harbor Freight cordless impact driver.  850in/lb of torque on tap, 2200RPM max at 18volts. It has a quick-disconnect 1/4" drive hex, this will make it super-simple to adapt a Wheely King drive yoke.  Big block! It's hefty, I haven't weighed it yet.  I'll design a fake motor to go over it, but I think I may deviate from the norm, and do an inline or slant six.  Wheelbase is nineteen inches.  Got the front shocks mocked up into place, and starting to work out the tierod setup.  And that's where my dropped axle could get re-designed. There is no provision for a Pittman arm/ draglink hookup in my CAD yet.  If you can make a stereo-pair work, here's the project in 3D.  Dropped to monochrome to get an idea what the lines are looking like. I'm thinking bright red for the chassis, gloss black for the axles and suspension, with some silver parts for interest. ...more to come, but orders to fill comes first today. |
|
|
|
Post by killbucket on Dec 19, 2010 20:14:59 GMT -5
  Yes, it's a 750-series motor, DC 18volts. Harbor freight #67028 Listing here.In the foreground are two old-school brushed motors of the size commonly used in RC, the 540/550 series. I may have to disable the impact hammer inside, we'll see. If it shreds axle gears, I'll explore better gears! It is a brute, look at the size of the cooling setup. My mount slips halfway onto the two halves of the black truncated drill body, to keep them from separating under torque. In shortening the housing, it lost all of its assembly screws except for the four ones holding the metal snout on.  My dinner-plate-sized hands don't really give you a feel for the size of the thing.  Next, I'll put in the rear cross brace around the drive shaft/pinion, so the rear of the chassis is braced against twisting. Incidentally, the drive rotates counter-clockwise as seen from the driver's seat, so the left side of the chassis lifts under torque.  Another stereo-pair.  The aforementioned brace. I suppose you've noticed the rough cuts- I ran these parts at the absolute fastest the machine would do them, just as an experiment. Actually, they didn't come out too bad. This one part was made in about a minute and a half. Once all the bonds are set on the chassis, I'll go back over it with a flat file and pretty it all up before it gets painted.  Another angle. This frame is not going to flex very much, despite being made of polymers. you get a pretty good look at my axle locks here- I'm drawing up my own, more conventional tube-types, as I've pledged to only actually purchase the drive unit for this project.  View from under Wifey's precious glass table. I can't wait to sizzle the tires off this. Yes, I know the plastic tires will be TOAST in nothing flat. The idea of this project is to build a operating scale model, not a basher or play toy, and to push my milling skills.  The business end. The loop holds the motor/planetary in place. with it off, the whole motor/trans unit can be lifted out.  And the loop plate will be held in with pins and clips using the two holes here. No tools will be needed to take out the drive unit.At 18 volts, the output shaft is supposed to turn 2200RPM. Divided by the rear axle ratio of 2.92, we get a max ~750RPM. The back tires are 5.16 inches in diameter, with a roll-out (circumference used to simplify the math) of 16.2106 inches for each rotation. 12200 inches per minute equates to about eleven and a half MPH. Since the model is about 1/5 scale, the scale speed is about 55MPH. Sounds slow on the face of it, and it really is. But- "Fast" is a no-brainer today, thanks to Brushless and Lipo. And it really isn't much fun...I built electric dragsters years ago, and soon found them very boring. Fast is: Zip! Right past ya. Zap! right past ya. Zowie! Right through the neighbor kid. (translation: throttle-brakes-throttle-brakes-throttle-ambulance.) You can get vehicles out of boxes that go 70MPH today, and they have warranties! Torque, however, still hasn't shown up in RC, outside of scratchbuilt pullers, which will never, ever go mainstream. This puppy will have grunt, yet still manage a fair speed for noodling around. It's a 454 Rat motor with a big two-barrel on it. I'm making the frame as stiff as possible, but it will only make me smile if it lifts one front wheel on takeoff. I've placed the motor a bit more forward of what's shown in the CAD above. This gets more weight on the front for a bit better steering, and unloads the rear axle for oversteering easily, as a front-engine, rear-wheel drive chassis should. I haven't decided if I'll put a locked differential in it...positraction* might be fun. *I had to ADD that word to dictionary?!?! All these years later, and PC's still don't have posi. |
|
|
|
Post by killbucket on Dec 19, 2010 20:16:53 GMT -5
 USB drives.  Bugatti I made about ten years ago.  A Steampunk spider made of brass, copper, lead, tin, ...  More CAD. You can see the layout of my wheel adapters here, as well as the current motor placement. The cross-braces shown should take final shape today, along with a drive shaft. the hubs (yellow parts) have GOT to go... __________  Come see my HUGE 3-channel Helicopter collection! www.killbuckets.com/copters.htm |
|
|
|
Post by killbucket on Dec 19, 2010 20:17:50 GMT -5
In doing this project, I've learned how to get the robot to cut my parts VERY accurately. The Shopbot is supposed to do +/- .01", which is really good for working the WOOD they are primarily used on. My bearing race there was out of round in one axis on the first run, and I used a measurement of the error to adjust the lower Vexta harmonic drive unit's rack. Then I measured the error again, an got it even tighter. I went one step further: I measured the error again, and then drew the bearing seat as an ellipse, knowing the machine would only do a circle! It fits perfectly into its bore.  I want to make a crank-fired airsoft gun, possibly a multi-barreled Gatling, that will never need batteries. Instead, a steady supply of 6mm airsoft ammo and cheeseburgers will make it go. KEY to this contraption is a gearbox with more than one axis, that can take a beating. Using a gearbox JUST like what I've drawn, I can make a drive unit that will split its out put at 90deg., allowing a shaft to turn a barrel pack, and another to operate a piston/feed tube. The HPI Wheely King is sturdy enough, and the geartrains are cheaply available, both in stock and VERY upgraded forms.  Made my own Wheely King axle lockouts from fiberglass tubing that just happened to BE .71" inside diameter...any of you hackers out there know this IS the magic dimension needed, to avoid having to turn the id of a PVC pipe...which can break quite easily.  It turned out that I'd had the material for some time and didn't realize it. More on what it is in a minute... Note the top "X" shaped brace in the rear frame, and how choppy the cuts are. The CNC was long overdue for an adjustment.  Here's a closer look at those axle lock-outs. I made them from sections of a cheap walking stick (cane) I got when I injured my knee about ten years ago. I don't recall the cost, but there is enough material in ONE for about 10 sets of lockouts. Not exactly easy to cut, this came in handy:   I dreamed up a new motor mount, and made same. I dropped the motor way into the frame rails to lower the CG from what I'd initially drawn.  Notice the cuts on THESE cross-braces, that were made today. Nice and tight!  This should handle real well with the motor lump down low like this.  Just a tiny bit of drive shaft to fab.  My first axle center section, not necessarily part of THIS project. I've got the stock inner shaft mocked up, but have custom shortys planned, they will be made on this:   This was more to hone my CNC skills and check my machine adjustments, but it was a confidence-builder as well.  With the drive cover on. This casing is about 400% stronger than what the Wheely King comes with.  Stretched out on the glass, steering servo placement is next or so... What do you think? |
|
|
|
Post by killbucket on Dec 19, 2010 20:19:02 GMT -5
UPDATE: The Trolls-Royce.  I made a whole new front axle assembly, and dropped it a bunch further.  I made my own hubs, and re-used a set of Wild Willy2 front axle shafts, which I press-fitted into them.  All parts were made from my favorite build material: 6mm black ABS sheet from www.interstateplastics.com.  The "brake drums" may go...haven't decided if they're worth the added weight.  This axle is about .375" lower than the previous one.  You can see the steering drag link here, hooked to nothing yet. I still have to decide where the servo for the steering will go.  It's got a nice rake with the "Dago'd" axle (which means San Diego, not something racist).  Getting further along!  Just for gits and shiggles, I dropped the 41 Willys Coupe body over it.  Since I've based my build on its track and wheelbase, it fits right on. Size Reference: That's Syma's BIG Chinook Helicopter* -not the smaller one- next to it.  The original toy did not tuck tire like this, though.  Makes me wish I was GIJoe-sized. Good luck finding one of these bodies- they weren't available long. I got mine at Toys R Us about 3 years ago.  While this frame does line up well in here, I have another already drawn up, and the other axle from the Donor HPI Wheely King crawler.  And to be "proper", the Willys needs leaf springs, not coil-overs.  This body goes back into the hidey-hole it was in for another day. I've started drawing up the Rolls-Royce grille and hood, which will then dictate where the steering servo can be. * www.air-sharp.com/chinooksBIGcopter.htm |
|
|
|
Post by killbucket on Dec 19, 2010 20:19:48 GMT -5
I've started mocking up the body parts, fiddling with hood/cowl proportions. Studying old Rolls-Royces... They reflect the economics of their time. Labor was cheap, technology expensive. Today's cars are built under the opposite conditions; labor is expensive, technology cheap. In 1928, an oil pan needed a bazillion bolts. Because making a stiff one wasn't cheap, and tightening all those bolts was. Today, a stiff oil pan is designed using as few fasteners as possible. Fasteners equal cost at virtually every point in a product's life cycle: at assembly, in use, under repair, and at recycling. They are ultimately some of the highest-cost components in most assemblies, once they are placed correctly.  Be sure to check out allcarcentral, too. I found these, and many more remarkable items there. I would totally sell my own Mother out to own something like this.  ...no, like this, I need open air. This is the grille I'm probably going to model mine from.  Gorgeous, huh? As far as old cars go, NOTHING was made as nicely as the Rolls-Royces.  Notice the top hood panels are curved, not flat. My render is wrong.  "Hey, I'm getting a Woody, too!" Nice as this one is...I've personally seen nicer*.  One step up from owning Ol' Chitty herself. Even Truly Scrumptious was slumming around, compared to this. check out the "driver-only" wiper.  I have not personally seen a more SteamPunk-y vehicle, than this example.  THIS is just stunning.  Chitty-Chitty's more staid older sister? Boat-tail. I like the look, worth considering...  I think this is the same one I saw in Sacramento earlier this summer. VERY nice car.  |
|
|
|
Post by killbucket on Dec 19, 2010 20:21:55 GMT -5
BACK to the roadster:Drew this up this morning, and alternate body, a C-Cab MackAC.  Got the driveshaft in, pics in a bit...
|
|
alfa1
New Member
Posts: 12
|
Post by alfa1 on Dec 19, 2010 22:41:59 GMT -5
Not worth its own thread, so I'll just hijack this one for 15 minutes of fame. Just now, I finished a set of drawers for the bedroom, at only about 10 or 20 times the cost of buying some new ones from a shop. 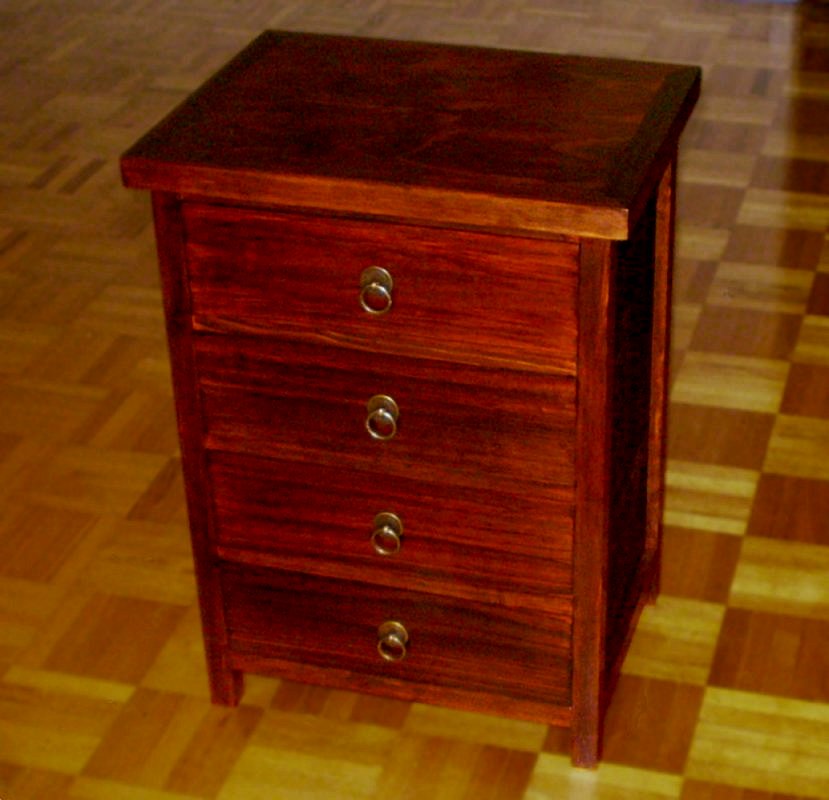 |
|
|
|
Post by killbucket on Dec 19, 2010 23:49:56 GMT -5
Gorgeous. That will last a few lifetimes, unlike the IKEA cardboard stuff in stores.
|
|


